Thursday 17 October 2013

Portfolio - Zombie Walk


This is my Second Attempt at my portfolio, for each portfolio I much prefer to use one theme for each portfolio so that it doesn't look to busy and its more organised. I really enjoyed this even due to all the people there were dressed up ready for people to see, the outfits and costumes and make up was amazing realistic and creative. This was one of the best shoots I have done on location for a while and hope to shoot more like this.

Portfolio - Fashion


This was my attempt at using iMovies creating a mini portfolio of my Fashion shoot I had previously shot throughout the summer.
I am pleased with the outcome of the shoot and wanted to give you all a short clip of a few of my favourite images.


Behind the scenes fashion designer Emily-Kate Siviter is enjoying the shoot herself
"Such a great shoot, can't wait for everyone to see"

Thursday 10 October 2013

Foyer Exhibition - Solihull College Blossomfield

Today we all had one of our favourite images printed off as A3 and placed in the Foyer of our college grounds just as you walk through towards the Art Department. 
All our images we our own personal preference, it didn't have to be a certain theme of images just our most favourite. I had chosen an image from one of the shoots i had done over the summer break in Digbeth for a friend who has started her own clothing range.
I was quite pleased with the outcome of this image, as you can see earlier I had edited this image as one of my photoshop attempts clearing up the skin. I was most pleased with the shallow depth of field because of using my 50 ml lens it put a focus point on the models face and feature making this a good portrait shot. 
I think this was a great start to our year of second years HND because it is showing off our work already to the college and other student making us feel more confident of our work and it give us more chance to get critical feedback not just from photography students.


Photoshop CS6 Editing


Original Image


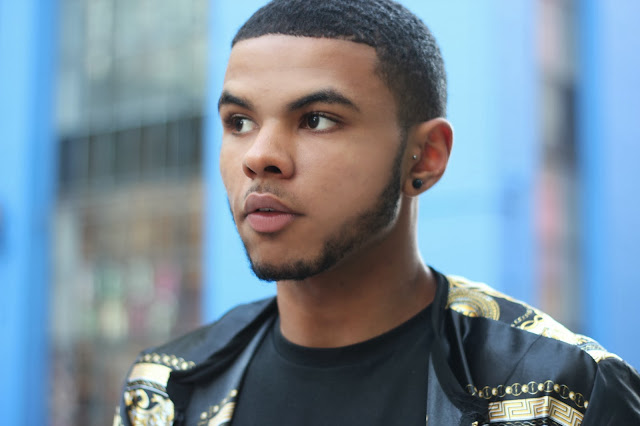
This is a photograph which I wanted to use as a portrait image in my portfolio for this project I am working on outside of college projects. Recently photographing clothing for Emily-Kate Siviter who is designing clothing for young male target audience but she will be ranging further for her target audience and I will be aiming to make a portfolio for her and myself of her clothing she has designed.


For this image in particular I really like the close up portraits using my 50 ml lens but as it is a close image you get all details in the skin on your image, as this young lad had a very blemished face I wanted to clear out any imperfections and to make his skin a lot clearer.


I started by using the 'Patch' tool on photo shop cs6:


Starting with the bold blemishes which needed erasing that will make it easier for me to "Airbrush" my image.

As you can see i have mini bridge open at the bottom of my photo shop to make it easier to select which images i want to edit clearly rather than having to go into each folder and find the image and then open them individually on photo shop

Once I had 'Patched' out all the larger blemishes on my subject skin I thought next I will crop my images to no exactly how close up I want my image.

As this is a portrait image for an A4 sketchbook I chose to crop my images 8 x 10 inch so it will fit nicely in my sketchbook leaving room for a border if one was wanted.

After 'Cropping' I came to the 'Airbrushing' this is a cheat way of clearing up the skin on a model also not the most professional way but I find it a lot easier and still effective.

I use the 'Brush' tool on my photo shop and put the opacity right down this is after I have cloned the original layer so later on I can change the opacity of the whole image which I have edited on if it is to much airbrushing.


For the 'Airbrushing' I would use the colour picker and select the picker each time I wanted to go over and area of the face, by using the brush and lowering the opacity it give a light brush over the face as if you was covering the skin with makeup.

Once I went over the face clearly I noticed it looked a bit to 'Airbrushed' so I lowered the opacity on the layer so you could still see a few details in the skin.

Also I tried this 'Airbrushing' on the lips on my model just to get rid of a few of the creases in his lips to make them look more clear and flawless.

Once all the skin was blemish free, I noticed the beard on the model was slightly patchy so I used the 'Healing tool' in a way it cloned areas I clicked on of the beard and placed it over the patchy sections.

I'm pleased with the final result of this portrait image, I'm feeling more confident to use photo shop but I will still be watching tutorials on photo shop skills to give me new ideas each time I come to edit an image.


Final Edited Image


Wednesday 9 October 2013

Hollywood Publicity Photographs


 My Own Attempt.


This is the lighting diagram of what I used to try and get the correct lighting for my Audrey Hepburn style image. This shoot only needed a honey comb attachment on my key lighting directly in front of my model, but slightly raised the case a small shadow below the models nose and neck. 
Using a honey comb to give a soft cast over my models face unlike a snoot would have been to harsh of lighting on the models facial features.


Holly Wood Publicity Photographs

James Cagney

The stylistic techniques used in this photograph would be the way to lighting has been positions around the face of the subject to create sharp dark shadows above the eyes which are formed from above the eyelid being a blocker of the light source in some way, for example you can see from this photograph the lighting was taken from above the model also it has caused shadows around the jaw giving it more of a masculine effect but also the idea that this man is playing the character of a dangerous man just from lighting, pose and expression can change the whole view of an image.

This photograph links well with another image I had research of Lauren Bacall.


These are a couple of images of Lauren Bacall also showing the shadows just above the eyes to give that seductive mischief look about her, making the character look more dangerous but it may not be aggressive danger but to be aware of her way, all that is shown just by the expression on her face and the way the light portrays the way she wants to be known for. For example the sharp detail around the jawline and there being less shadows making this look more of a direct shot of light on the models face, I think that you would be needing a very strong powered light for this shot, natural lighting wouldn’t be able to get the same effect on this image as a powered light bulb can.


Audrey Hepburn was another female I had looked at to show similarities to the lighting used in Lauren Bacall’s images.
As you can see there are fairly any shadows on this image just under the nape of the neck showing the lighting must be from above looking down onto the subject but to avoid any harsh shadows below the eyes or nose they would use some sort of reflection below the models face to give the other features of her face a bit of shape and density. As I said earlier on that expression and pose is just as important as the lighting the images of Audrey Hepburn give off more of a soft glamorous atmosphere because of the soft lighting, this suits her completion well and this is a well know model used for glamorous beauty.


Other lighting I looked at to show more of a heroic figure would be of Errol Flynn.

Not only would it be the lighting but also the pose gives of the impression that he is a wanted man by the ladies but a heroic one at that the way he’s looking away from the camera gives off the impression he has something better to look at, something more important and is looking up, just like the lighting. The lighting seems to be looking up at the subject creating harsh shadows around the jaw line and cheekbones to give of a strong feel towards this subject just like the character he would be playing as a strong leader.

It also looks like there is fair lighting behind the model the give the shape of the hair so the model doesn't slowly fade away into the back ground, this is most definitely not a flat image is as dimension and looks like it wants to stand out to be a powerful image.

Thursday 3 October 2013

High Speed Water Droplets

My Own Images


Final Evaluation

For my high-speed water droplet experiment I think it was a very enjoyable shoot, it took a lot more time to prepare the shoot than it did taking the photographs it self, the real skill would be the time before each droplet falling and capturing as the droplet his the water base. I think that this could have been a more successful shoot if I was able to bring in all the equipment I wanted for example If I was to spend more time on this shoot I would be more creative with the coloured background reflection rather than using what had already been used by other students but although it was the same background reflection as other images you make the image look different each time. All of my images are central and have and even amount of frame around the droplet also each splash/ droplet has a different form it is a lot harder to try and capture the exact same droplet as the previous time.
The only main issue I had when taking these photographs I found it a lot harder to focus on the droplet area, I did try and place a pen where the water was falling and used auto focus, then changing it to manual as I was taking my photo’s so it wouldn’t keep attempting to auto focus each time I photographed. Other than the focus and lack of creativity I think that this was a successful shoot I am pleased with the outcome. Also as my favourite image would be the first photograph I had posted other peers I had asked thought the same because of the vibrant colours and positioning of the droplet being central and eye catching.


Set up


This is the set up in the studio we had for our water droplet experiment, explaining what each of our equipment was used for; Freezer bag to have liquid in for the droplets them selves which is hanging on the two stands and pole which is placed above the tray of water. Tripod is to keep the camera facing down on the tray to capture the splash and ripple effect clearer. Tape is used to stick any coloured background, which you would like to use to give off a coloured reflection in the water. Pin to pierce a small whole in the sandwich bag full of water or food colouring.
Flash will be off camera and using a hot sheer attachment place the flash where you would like to capture the most of the droplet if needed prop up on a box or some sort of box to lift it up higher. You will also need a trigger for the camera as it makes it easier to shoot can capture without having to touch or more the capture out of position at any point due to you having to auto focus the droplet at first and then clicking it manual before you begin the shoot.

The settings on your camera:
ISO - 100
F-Stop - 16
Shutter- 1/250
White balance - Flash

Flashgun - ETTL:
Fire a pre flash and it with automatically measure the light and work out the power for your next flash, the faster shot needs less power 128th is usually the lowest if you don't have ETTL.


Research


These are a few examples of Dr. Harold Edgerton’s work on his high-speed flash project. This isn't the exact style of photograph I am aiming for but looking through his work has given me some inspiration in new ideas. The idea of adding other objects to water drops to give it that dramatic effect to the photograph can explode the minds imagination.


Syl Arena, Speedliter's Handbook


Plan of shoot.

Equipment needed:

1.Studio
2.Table
3.Camera (Cannon 600D)
4.Flash Gun High Speed
5.Milk
6.Food Colouring
7.Watering Can
8.Towels/Flannels
9.Tripod
10.Celetape
11.Empty Trays
12.Pins
13.2 Stands & A Pole


For this shoot I will be attempting my own high-speed water drop using the equipment I have labeled above. It is important to understand that it is not the camera shutter speed that is freezing the droplet movement; it is the flash duration that does the work. in a completely dark room the shutter could be left open for minutes and a frozen image will still be taken if you are using flash.If the flashguns are set to use full power the duration of the flash is around 1 millisecond (1/1000 second) this long flash duration will cause motion blur and degrade the final image, this is one reason why in-built flashes are a poor choice. Set to 1/128 of full power the 580Ex flashgun produces a flash that is only 1/30,000 of a second duration, that’s 30 times shorter than the gun on full power.